 Content
Description
The Material flyout allows the manipulation of materials in an active document. Materials can be added or deleted and their properties can be changed.
The top tree view displays the materials that are present in the active document. The bottom tree view displays materials from a material databank, which can be used for all documents.
The material database is divided into two parts: the first part is read-only and is maintained by infomind or third-party, the second part includes all user-defined materials. The material data maintained by infomind or third-party can be updated either using the menu command Update... or in the Options dialog window Database/Templates.
The Properties flyout shows the properties of the selected material.
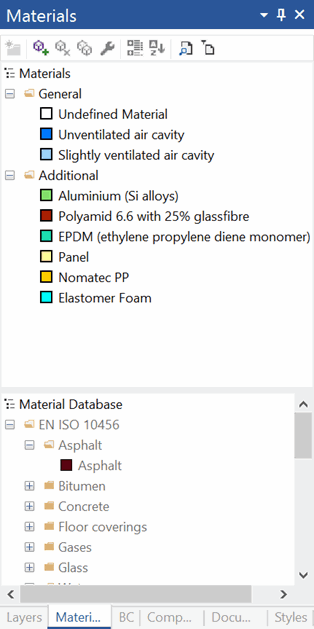
Figure 1: Material flyout
Creation, Modification, Duplication and Deletion of Materials
The following description is valid for both the top materials list (current document) and for the lower materials list (database).
To create a new material, click on the ![]() icon in the flyout. Alternatively, you can use the context menu command (right click) New Material. The new material can be defined in the Material dialog window. After you have defined the properties, click on OK and the new material appears in the current category.
icon in the flyout. Alternatively, you can use the context menu command (right click) New Material. The new material can be defined in the Material dialog window. After you have defined the properties, click on OK and the new material appears in the current category.
If you would like to modify the properties of an existing material, select it in the list, and click either on the ![]() icon or use the context menu command (right click) Edit or double click on the material. This opens the same dialog window that is used to define a new material. You can now modify the properties of the material.
icon or use the context menu command (right click) Edit or double click on the material. This opens the same dialog window that is used to define a new material. You can now modify the properties of the material.
If you wish to rename a material you can do so by choosing the context menu command (right click) Rename. You can also rename the material by selecting it and then clicking on its name just as you would rename a file under Windows Explorer.
To duplicate a material entry with an unique name, click on the ![]() icon in the flyout. Alternatively, you can create a duplicate by using the corresponding command in the context menu (right click on the source entry) Duplicate. All properties of the copy are identical with the ones of the source, if needed the properties can be adapted in the Material dialog window.
icon in the flyout. Alternatively, you can create a duplicate by using the corresponding command in the context menu (right click on the source entry) Duplicate. All properties of the copy are identical with the ones of the source, if needed the properties can be adapted in the Material dialog window.
You can delete a material by selecting it and either clicking on the ![]() icon or by using the context menu command (right click) Delete.
icon or by using the context menu command (right click) Delete.
Grouping Materials into Categories
If you are using many materials, it makes sense to organize these into Groups or Categories.
Categories are comparable to file folders and directories; this is why they have the same symbol. Upon creation, every document generates a General category. You can create further categories by clicking on the ![]() icon in the flyout or by right clicking on an existing category (or material for that matter) and using the context menu command New Category. The category is created within the selected category. You can also define a name for this category.
icon in the flyout or by right clicking on an existing category (or material for that matter) and using the context menu command New Category. The category is created within the selected category. You can also define a name for this category.
To delete a category select the category and click on the ![]() icon, or use the context menu command (right click) Delete. You can rename a category by selecting it and then clicking on the
icon, or use the context menu command (right click) Delete. You can rename a category by selecting it and then clicking on the ![]() icon, or by using either the context menu command (right click) Edit or Rename. Alternatively, you can rename the category by selecting it and then clicking on it again to rename it just as you would rename a file under Windows Explorer.
icon, or by using either the context menu command (right click) Edit or Rename. Alternatively, you can rename the category by selecting it and then clicking on it again to rename it just as you would rename a file under Windows Explorer.
Only empty categories can be deleted.
To move a material from one category to another you can simply drag the material with the mouse into the desired category.
Copying Materials
You can copy materials from the database to the materials list of the current document (or vice versa) by dragging the material to the desired location.
Searching the Material Database
If you are looking for a specific material or you would like to get an overview of a specific material group, then you can use the filter function in the flyout.
|
|
Figure 2: Dialog window - Filter properties |
Figure 3: Top part of Material flyout |
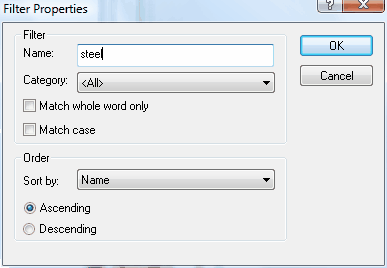
To look for a material or a material group in the material database click on the ![]() icon in the flyout, or use context menu command (right click) Define Filter.... The Filter properties dialog window will appear.
icon in the flyout, or use context menu command (right click) Define Filter.... The Filter properties dialog window will appear.
Under Name you can enter the name or part of the material name that you are searching for. Additionally, you can define the Category for which you would like to limit your search to. After you have defined the filter criteria, click on OK, and the filter results will be displayed in the materials database window of the flyout.
You can the switch between the Filter Criteria and the Filtered View settings by clicking on the ![]() icon in the flyout or by using the context menu command (right click) Filtered View.
icon in the flyout or by using the context menu command (right click) Filtered View.
Exporting and Importing Materials
The Export command from the context menu (right click) for the category, materials, or database allows you to export the corresponding user-defined material(s) to a comma separated (CSV) file. The selection of the exported materials is defined by the mouse cursor position at the time the context menu is prompted. Only the user-defined materials can be exported.
Besides loading an existing material database or creating a new database (cf. Options), you can complement the existing flixo material database with data from specially structured text files. To do this, use the context menu command (right click) Import. The data will either be inserted into the database or into a category. The position for the insertion of the date depends on whether you right click on the database icon or on the category icon.
The structure of the comma separated text file corresponds to that of the materials export file. To create a comma separated text file with the correct structure, it is easiest to export an existing database and then edit that file with a spreadsheet program (e.g. Excel) making sure to save the file as a CSV text file.