Description
The Boundary Condition tool allows you to define the boundary conditions and optionally (cf. Cavity Options dialog window) the radiation properties of the surfaces, which are needed for a complete definition of a physical problem.
How do I activate it?
The Boundary Condition tool can be activated with the menu command Boundary Condition in the menu Insert or by clicking on the ![]() icon in the Toolbox flyout. When the tool is active, the mouse cursor becomes a
icon in the Toolbox flyout. When the tool is active, the mouse cursor becomes a ![]() .
.
How do I use it?
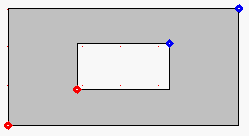
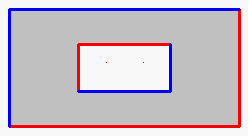
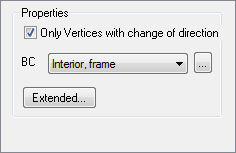
When you have activated the tool, choose the desired boundary condition from the Boundary Condition flyout or from the Boundary Condition drop down list in the tool properties (see figure 3). Set the mouse on the spot on the edge of a domain from which the boundary condition should be valid, and click on the spot. If the option Only vertices with change of direction is checked, the boundary condition will be assigned to the nearest corner with change of direction. The boundary condition is now represented as a point, which has the color of the corresponding boundary condition (see Boundary Condition flyout). Only the start points of the boundary conditions are defined (see figure 1). The boundary conditions are shown deferred as polygons, if the corresponding option is selected in options dialog window (cf.User Interface Options dialog window). When you calculate the construction, the validity of the construction is also computed. After doing so, the boundary conditions will be shown with the corresponding color around them (see figure 2).
Following rotational direction rules apply for boundary conditions:
•General: The boundary condition of the starting point is valid for all edges, where there is material to the left of the boundary condition up to the next starting point (see figure 1 and figure 2).
•Exterior Boundaries: for all edges, the boundary condition runs counterclockwise from the starting point to the next starting point.
•Interior Boundaries: for all edges, the boundary condition runs clockwise from the starting point to the next starting point.
Defining Boundary Conditions
A new boundary condition is always created by the indicated boundary condition from the boundary condition drop down list (see figure 3). You can either change the selection in the Boundary Condition flyout or you can choose the respective boundary condition from the boundary condition drop down list in the tool properties.
The boundary condition can also be changed afterwards by using the Assign Properties tool or by using the Drag&Drop function (see lesson 1).