Description
With the Air Cavity EN ISO 10077-2 tool you can create air cavity material domains according to the EN ISO 10077-2 standard. You can also assign emissivities (long-wave radiation properties) at the surface of cavities according a material surface properties table.
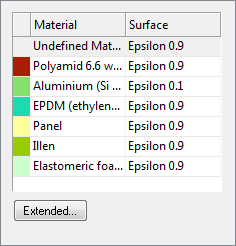
Figure 1: Material Surface Properties table
The assignment of the surface emissivities is only possible, if the emissivities of the air cavities are calculated by flixo (cf. Cavity Options dialog window) and are not directly defined by the air cavities materials (cf. Material dialog window).
How do I activate it?
The Cavity Wizard can be activated with the command Air Cavity in the menu Insert or by clicking on the ![]() icon in the Toolbox flyout . When the tool is active the mouse cursor becomes a
icon in the Toolbox flyout . When the tool is active the mouse cursor becomes a ![]() .
.
How do I use it?
Generating Cavities
With the Cavity Wizard, you define the material domains in which air cavities should automatically be created according to EN ISO 10077-2. The EN ISO 10077-2 differentiates between two categories of air cavity material domains:
• Unventilated air cavities
•Slightly ventilated cavities and grooves
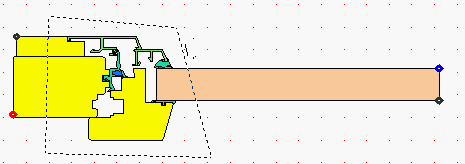
Figure 2: Domain definition
Activate the Cavity Wizard and click on the spot where you want to position the first corner point of the domain. Then click on the spot where you want the second corner point to be until you have created the domain in mind. To finish the input process and thus to close the domain, there are two possibilities:
•Click on the point where you began (the starting point of the visible line). When you reach this point with the mouse, the cursor should become a![]() .
.
•Choose the command Close from the context menu (right click). The Cavity Wizard will automatically create the corresponding material domains.
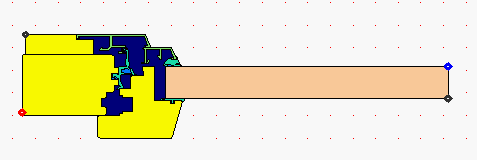
Figure 3: Air Cavities
If you want to remove a point you have just defined, choose the command Remove Previous from the context menu (right click).
To interrupt the entire domain entry process, you can either choose Cancel from the context menu (right click) or you can hit the ESC key.
If you additionally press the Shift key while you are drawing, then the entry will be limited to the multiple of an element angle. First release the mouse button and then the Shift key. The element angle can be defined in the Option dialog window (Application>Tools>General).
Defining Materials
The Cavity Wizard needs two air cavity materials - one for the unventilated and one for the slightly ventilated air cavities. The names of these materials are defined in the Options dialog window (Application>Tools>Cavity Wizard). If these materials do not exist in the document or the material type does not correspond, while defining the start point, you will be prompted with an Air Cavity Material dialog window to either choose existing air cavity material(s) from the Document Materials table or to create new air cavity material(s).
Optionally, you have the possibility to define small domains, which often arise as a consequence of drawing impressions, as "critical material" (see Special Materials Options dialog window) instead of being defined as "cavity material". These layers will then automatically be assigned with the material of a particular neighbor.
Assigning Surface Properties
Activate the Cavity Wizard and click into the cavity to whose surfaces you want to assign automatically the emissivities, based on the neighboring materials and the material surface properties table. The assignment takes place according to the present settings in the material surface properties table (cf. figure 1).
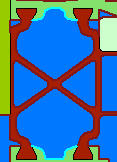
Picture 4: Air Cavity with automatically assigned surface properties (4 radiation boundary condition points)
 Limitations
• The wizard polygon domain must have at least three corner points.
•It is not possible to create edges where one edge of a domain cuts across another edge of the same domain.
• There must be at least one unventilated air cavity material and one slightly ventilated air cavity material present in the document.
•It is only possible to assign surface emissivities, if the cavity emissivities are calculated by flixo (cf. Cavity Options dialog window) .