Description
The Rectangular Domain tool allows you to create rectangular and square material domains.
How do I activate it?
The Rectangular Domain tool can be activated with the command Rectangular Domain in the menu Insert or by clicking on the ![]() icon in the Toolbox flyout. When the tool is active, the mouse becomes a
icon in the Toolbox flyout. When the tool is active, the mouse becomes a ![]() .
.
How do I use it?
Mouse
After you have activated the Rectangular Domain tool, you can define the rectangle with two points, which lie diagonal from one another. Click on the place where you would like to set the first point. When you move the mouse, you will see a dashed preview of the domain, which constantly changes as you move the mouse. When you click again you will determine the second point defining the domain.
If you hold down Ctrl when you draw the domain, the first point is not a corner point of the domain, but rather the center point of the domain. If you hold down the Shift key when you draw the domain, then a square will be created. The combination of both keys then allows you to create a square that is defined by its center point.
You can interrupt the input of a domain by right clicking and choosing Cancel from the context menu or by hitting the ESC key.
Keyboard
After you have activated the Rectangular Domain tool, make sure that the Rectangular Domain tool properties are visible. If this is not the case, then you can make them visible with the menu command View.Toolbox (see figure 1). Hit the Tab key or click on the first field of the tool properties . You can activate the individual fields by repeatedly hitting the Tab key or by using the Tab key while the Shift key is held down.
You can enter the coordinates, the dimensions, and the reference of the domain. The coordinates of the reference point can be entered in the fields marked with x: and y:, the width can be entered in the field marked b: and the height can be entered in the h: field.
The Reference Point Control, symbolized by ![]() determines the position that defines the reference point. The reference point can be a corner, midpoint or the center of an object. The selected point is marked in red, and can be changed with the mouse or the arrow keys. When all the parameters have been defined then you can finish the process by clicking on the Create key.
determines the position that defines the reference point. The reference point can be a corner, midpoint or the center of an object. The selected point is marked in red, and can be changed with the mouse or the arrow keys. When all the parameters have been defined then you can finish the process by clicking on the Create key.
Defining Materials
A new domain will always be created with the material, which is selected in the Materials table. You can change the material of domains you want to create either by changing the selection in the Materials table or by choosing the material from the drop down list ![]() .
.
You can also change the material of the domain afterwards by using the Assign Properties tool or by using the Drag&Drop function (see also lesson 1).
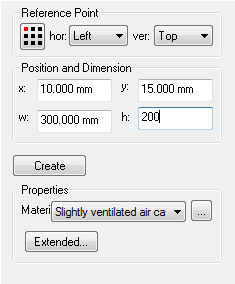
Figure 1: Rectangular Domain properties